Last Updated: October 18, 2026
If you use a MacBook Pro for work calls all day, you already know the built-in camera is just okay. It’s fine for a quick check-in, but it falls apart in low light, looks soft if you crop in, and gives you zero flexibility on angle if you dock your MacBook closed. A good USB-C webcam fixes that without a tangle of adapters.
The catch: most webcams still ship with USB-A cables in the box. On a MacBook Pro with only USB-C / Thunderbolt ports, that means dongles, docks, or replacing the cable. Get the connection wrong and you get dropouts, a camera that won’t wake from sleep, or 4K that silently drops to 1080p.
📄 In This Review
The USB-C problem on MacBook Pro
Newer MacBook Pros only have USB-C shaped ports, plus HDMI and an SD slot on the 14-inch and 16-inch models. They will accept almost any webcam through a hub, but for daily work use you want one of these three setups:
1. Native USB-C cable in the box. Plug straight into the MacBook or a USB-C monitor. Fewest failure points.
2. Detachable USB-A cable you can swap for USB-C to USB-C. Common on better business webcams.
3. Fixed USB-A cable + adapter. Works, but it puts stress on the MacBook port and is easy to knock loose.
In practice, option 2 is the sweet spot. Native USB-C webcams exist, but choice is limited. A webcam with a standard USB-C port on the camera end and a supplied USB-C cable is just as clean, and you can replace a 3-foot cable with a longer one if your desk setup needs it.
One other Mac-specific issue: power. If you plug a 4K webcam into a cheap unpowered USB-C hub alongside an SSD and a phone charger, macOS may show the camera but give you a black image or stuttering. Plug the camera directly into the MacBook or into a powered dock if you see that.
What to check before you buy
See also: Best Monitor for MacBook Air: Two USB-C 4K Screens and Six Adapter-Dependent Alternatives • Best Monitor for MacBook Pro: Eight Listings Sorted by Cable, Sharpness and Scaling
Resolution is not the whole story. For Zoom, Teams, and Meet, 1080p at 30fps with good autofocus and exposure beats a cheap 4K sensor that looks noisy and lags.
For MacBook Pro use, prioritize this list:
Plug-and-play UVC support. macOS does not need drivers for most webcams. If a listing talks about requiring a Windows app for basic 1080p, skip it. Companion apps for framing or firmware updates are nice, but the camera should work in FaceTime and Zoom without them.
Autofocus that actually holds. Cheap fixed-focus webcams keep your face soft if you lean back. Cheap autofocus hunts every time you move your hands. Look for reviews that specifically mention stable focus at desk distance, about 2 to 3 feet.
Low-light handling. Home offices are rarely well lit. A larger sensor with good auto-exposure matters more than 4K on paper. If your room has a bright window behind you, auto white balance and backlight compensation matter even more.
Microphone and privacy. Most people are better off using AirPods or a USB mic and muting the webcam mic. Still, dual noise-reducing mics are useful as a backup. A physical shutter beats a software privacy button you have to trust.
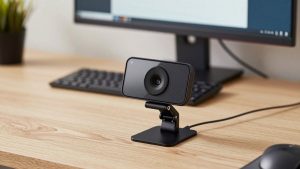
Mounting. MacBook Pro lids are thin. A heavy webcam with a stiff clamp will wobble or tilt the screen. A light clip mount with a tripod thread underneath is the most versatile for both laptop and external monitor use.
What type suits which worker
Instead of chasing one winner, pick by how you work. Most MacBook users fall into one of these three groups.
1. Docked most of the time: get a midrange 2K or 4K webcam with a detachable cable. You sit in the same spot, you want to look sharp on client calls, and you run the camera through a monitor or dock. A basic 1080p webcam for MacBook is fine for internal calls, but if you present, record Loom videos, or teach, the extra detail and better lens on a 2K/4K model is visible even after Zoom compression.
Trade-off: 4K uses more CPU and bandwidth. On an M1/M2/M3 MacBook Pro it’s usually fine, but if you also share screen and run background blur, you may want to run the camera at 1080p in the app settings. Also, many 4K webcams default to a very wide field of view that shows your whole messy room. Check that you can set 65 to 78 degrees.
Failure mode to watch: heat. Small 4K webcams get warm after 60 to 90 minutes. Good ones just get warm. Bad ones drop frames or disconnect. If your calls run long, read long-call reviews, not 5-minute unboxings.
2. Hybrid and hot-desking: get a light 1080p USB-C webcam. If you carry the camera in a bag, weight and cable matter more than 4K. You want something under 3 oz, with USB-C straight in, no adapter to forget. Image will not wow anyone, but it will be consistently better than the built-in camera in a dim conference room.
This is where the cheaper option is honestly fine. A well-reviewed USB-C webcam for laptop with autofocus and dual mics will cover 90 percent of meetings. Spend the money you save on a small ring light or just facing a window.
Failure mode to watch: clip tension. Travel clips loosen over time. If it slides on the MacBook lid, it will slowly point at your forehead mid-call. A model with a rubberized grip and a folding foot that rests against the back of the lid stays put.
3. Presenters and creators: get a premium 4K webcam with a large sensor. If clients judge you on video quality – coaches, consultants, YouTubers, online teachers – a high-end 4K webcam for Mac with a bigger sensor, good low-light, and digital zoom without mush is worth it. These usually have a USB-C port on the camera and ship with both USB-C to USB-C and USB-C to USB-A cables.
Trade-off: price and fussiness. They are pickier about lighting and framing. Auto-framing can cut off your hands when you gesture. Turn on manual framing for presentations.
Failure mode to watch: macOS permissions. After a macOS update, premium features like background blur in the vendor app can stop working until you re-grant Camera and Microphone access in System Settings > Privacy and Security. If Zoom sees the camera but the vendor app does not, that is almost always the cause.
| Use case | What to buy | Why it works on MacBook Pro | Downside |
|---|---|---|---|
| Docked office worker | Midrange 2K/4K, detachable USB-C cable | Plugs into monitor/dock, sharp for clients, tripod thread for shelf mount | Needs good light to look its best, heavier on lid |
| Hybrid / travel | Lightweight 1080p with native USB-C | No dongle, low power draw on hubs, fast setup | Softer image, narrow dynamic range in mixed light |
| Presenter / creator | Premium 4K, large sensor | Best low-light, clean 2x zoom for head-and-shoulders framing | Expensive, runs warm, overkill for internal calls |
| Budget backup | Basic 1080p fixed-focus | Works instantly in FaceTime/Zoom, fine if you are well lit | Soft if you move, poor in dark rooms |
Should you just use Continuity Camera instead?
Apple’s Continuity Camera lets you use an iPhone as a Mac webcam over USB or wirelessly. Image quality is excellent, especially in low light, and Desk View is genuinely useful for demos.
For occasional calls, it can replace a webcam. For daily work, a dedicated webcam wins on reliability. Continuity Camera fails in annoying ways: the iPhone times out, a call comes in and interrupts video, the mount slips, or wireless mode lags when your Wi-Fi is busy. Wired iPhone to MacBook with USB-C is much more stable, but then you have tied up your phone for every meeting.
Practical rule: if you take 3-plus hours of calls a day or dock closed-clamshell to a monitor, buy a real webcam. If you take two calls a week in a bright room, try Continuity Camera first.
Setup tips that matter more than specs
Use a direct port for 4K. If you must use a hub, use a powered Thunderbolt dock and keep the webcam on a USB 3.0 or better port. Avoid stacking adapters: USB-C webcam to USB-A adapter to USB-C hub is a common source of flicker.
Keep cables short. The included 3 to 5 foot cable is usually the most reliable. Ten-foot passive USB-C cables can cause 4K cameras to fall back to lower resolution or disconnect. If you need distance, use an active USB extension rated for USB 3.0.
Set field of view to 65-78 degrees for a desk. Wider than 90 degrees makes you tiny and shows everything behind you. Most decent vendor apps on Mac let you save this once.
Light your face, not your background. Put a $20 LED panel or even a desk lamp bounced off a wall in front of you. No webcam, however expensive, can fix a bright window directly behind your head. Close blinds or shift 45 degrees.
Test in the actual app. FaceTime previews can look different from Zoom or Teams, which apply their own noise reduction and auto-framing. Do a 2-minute test recording in Zoom with screen share on, the way you will actually work.
FAQ
Do I need a special Mac version of a webcam?
No. Look for UVC plug-and-play support. If it works with FaceTime without installing anything, it will work with Zoom, Teams, and Meet. Avoid cameras that require Windows-only software for basic functions.
Will USB-A webcams work on a MacBook Pro with only USB-C?
Yes, with a good USB-C adapter or dock, but for daily use a webcam with a detachable cable you can swap for USB-C to USB-C is cleaner and less likely to disconnect if bumped.
Is 4K worth it for Zoom calls?
Sometimes. Zoom compresses video heavily, so others will not see full 4K. The benefit is a sharper 1080p image, better digital zoom, and usually a better lens and sensor. If you only do internal calls in good light, 1080p is fine.
Why does my webcam disconnect when my Mac wakes from sleep?
This is usually power or hub related. Try plugging directly into the MacBook, use the original short cable, and uncheck settings that put hard disks to sleep. If it persists on a hub, move the camera to a powered dock.