Last Updated: September 18, 2026
A cable tray can turn a tangled bundle beneath your desk into a safer, easier-to-clean workspace. Installed poorly, however, it may sag under the weight of power bricks, pull cords out of their sockets, scrape a desktop, or leave cables pinched against a moving standing desk. A tray that is too short can also force cords into sharp bends, while an overloaded tray may loosen its clamps or tear out of the desktop.
This guide explains how to install an under-desk cable tray securely, whether you choose a no-drill clamp-on model or a screw-mounted tray. The same basic method works for a home office, gaming setup, or standing desk in 2026. Plan the cable path first, check the tray’s weight limit, and leave enough slack for every device that moves.
As an Amazon Associate we earn from qualifying purchases at no extra cost to you.


Quick answer: Our top pick in 2026 is the Under-desk cable tray — our #1 rated choice. See the full ranked comparison, alternatives and buying advice below.
What You Need
| Item | Why | Optional? |
|---|---|---|
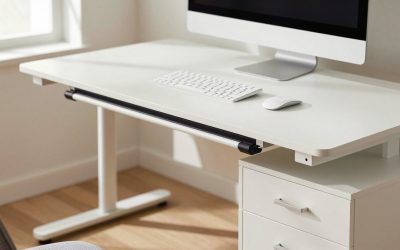
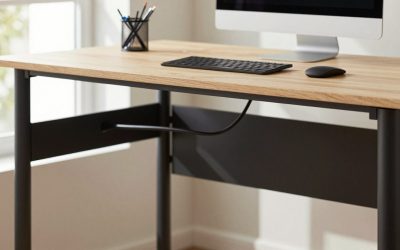
| Under-desk cable tray | Holds power strips, adapters, and excess cable length off the floor. Basic clamp-on trays typically cost about $14-$40; examples include a $13.99 two-hole clamp tray and a $38.69, 32-inch tray. | No |
| Tape measure | Confirms the tray will fit between desk legs, drawers, and crossbars. | No |
| Pencil or painter’s tape | Marks the tray position without permanently marking the desktop. | Optional |
| Phillips screwdriver or drill | Tightens clamps or drives screws on a screw-mounted tray. | No; a drill is optional for clamp-on models |
| Short wood screws | Secures a tray designed for direct mounting. Use only the size specified by the manufacturer. | Optional |
| Zip ties, hook-and-loop straps, or cable clips | Groups cords and prevents them from dropping below the tray. | Optional, but recommended |
| Power strip and surge protector | Consolidates plugs inside the tray and reduces floor-level clutter. | Optional |
| Stud finder | Useful only when mounting into a thick wood desktop or structural support. | Optional |
Step-by-Step
See also: Best Gaming Desk Pads for Full Desk Coverage • Best Desk Organizers Under $30: Match the Organizer to Your Clutter
1. Measure the desk and inspect the tray (10 minutes)
Measure the clear width under the desk, paying attention to legs, drawers, modesty panels, and the frame of a standing desk. A tray should be shorter than the unobstructed space by at least 1 inch so its ends do not interfere with the desk structure. For a 32-inch tray, look for at least 33 inches of usable clearance, or choose a shorter model.
Check the tray’s mounting method and weight rating before installing it. Add the approximate weight of your power strip, laptop charger, monitor adapters, and other equipment. A compact power brick may weigh 1-2 pounds, while a large collection of adapters can quickly exceed a tray’s capacity. Do not assume a metal tray can hold unlimited weight.
2. Plan the cable layout (10-15 minutes)
Decide where the power strip will sit and which cords need to exit at each end. Place the tray near the back edge of the desk, but leave enough room for clamps, screws, and the desk’s lifting mechanism. On a standing desk, trace the full route from the lowest to the highest position before tightening anything.
Keep power cords separate from delicate signal cables where practical. A simple arrangement is to place the power strip and bulky adapters toward one side, then route monitor, keyboard, mouse, and network cables through the other side. Avoid crossing cables over sharp tray edges or folding them into tight loops. Leave a gentle 3- to 6-inch service loop near devices that may need to be unplugged.
3. Position and mark the tray (5 minutes)
Hold the empty tray beneath the desktop and center it over the planned cable bundle. The front edge should not press against your knees when you sit. A common starting position is 2-4 inches behind the desk’s front edge, though the best location depends on the desktop depth and your legroom.
For a clamp-on tray, mark the clamp locations with painter’s tape. Make sure each clamp rests on a flat, solid portion of the desktop rather than a beveled edge, thin lip, cable opening, or unsupported glass panel. For a screw-mounted tray, mark the holes and check the screw depth. Screws should not be long enough to penetrate the desktop surface.
4. Attach a clamp-on tray (10 minutes)
Set the tray in position and thread each clamp against the underside of the desktop. Tighten the knobs by hand until the tray is stable, then give each one a small additional turn. Do not force the knobs with pliers; excessive pressure can crush particleboard, damage a laminate finish, or deform the clamp.
Check that the tray is level from left to right and does not twist when you push lightly on either end. If the tray rocks, loosen the clamps, reposition them on a flatter area, and retighten evenly. Some models include protective pads. Keep those pads in place to reduce slipping and surface damage.
5. Screw-mount the tray, if required (15-25 minutes)
For a screw-mounted model, remove the tray or use its mounting holes as a guide. Drill pilot holes only if the manufacturer allows it, using a bit slightly smaller than the screw shaft. Hold the drill perpendicular to the desktop and use tape on the bit to mark the maximum safe depth.
Drive each screw until the tray is snug. Stop as soon as the mounting flange is secure; overtightening can strip particleboard or pull the screw head through a thin metal flange. If the desk is made of glass, hollow honeycomb material, or unusually thin material, do not drill without specific manufacturer instructions.
6. Load and secure the cables (15-20 minutes)
Unplug the equipment before rearranging it. Put the power strip into the tray first, then place the largest adapters around it. Arrange adapters so their vents are not covered. Avoid enclosing a power brick in a tightly packed bundle, and do not place a hot transformer against a flammable material.
Route each cable toward its device with a smooth curve. Use hook-and-loop straps every 8-12 inches rather than cinching all cords into one tight bundle. Zip ties can work, but leave them loose enough that insulation is not crushed and use releasable ties where you expect future changes. Keep the cable leading to the wall outlet free of tension.
7. Test the setup through its full range (10 minutes)
Plug in the equipment and test each device. For a standing desk, raise and lower the desktop slowly while watching the cables, power cord, and tray. Confirm that no cord catches on a leg, becomes taut, or drags across the floor. Leave at least 2-4 inches of extra travel slack at the desk’s highest position, or follow the desk manufacturer’s recommended clearance.
Finally, push the tray gently from several directions. It should not slide, sag, or make a cracking sound. Recheck the mounting hardware after the first day of use.
Mistakes to Avoid
- Overloading the tray: Weigh or estimate the equipment and stay below the stated capacity. Heavy adapters should be distributed rather than stacked at one end.
- Blocking the sit-stand frame: A tray mounted too close to a leg or crossbar can collide when the desk moves.
- Using the wrong screws: Long screws can puncture the desktop. Use only the supplied hardware or the specified length.
- Pinching cables: Do not trap cords between a clamp, tray edge, or moving desk frame.
- Closing off ventilation: Power strips and chargers need reasonable airflow. Never cover vents or pack them tightly in fabric or paper.
- Mixing too many high-load devices: Add the wattage of connected equipment and keep it within the power strip’s rating. Do not plug one power strip into another.
- Skipping a final movement test: A cable that looks fine while seated may become taut when the desk rises.
How Often
Inspect the tray and cable bundle every three to six months. Check for loose clamps, bent metal, stripped screws, cracked plastic, frayed insulation, and dust buildup. Clean the tray with a dry or lightly damp cloth while equipment is unplugged. After moving the desk, adding a monitor, or changing from sitting to standing use, repeat the full-range movement test.
When to Call a Pro or Replace
Ask a professional for help if the desk is made of glass, stone, hollow-core material, or a thin surface that cannot safely support clamps or screws. Electrical work also deserves professional attention: call an electrician if an outlet is loose, warm, sparking, buzzing, or unable to handle the equipment load.
Replace the tray if it is bent, cracked, corroded, permanently sagging, or unable to hold its position after the hardware is tightened. Replace any cable with exposed conductors, melted insulation, burn marks, or a damaged plug. A more suitable tray may also be necessary if your equipment exceeds its capacity or if the desk’s movement repeatedly pulls the cables tight.
FAQ
Can I install an under-desk cable tray without drilling?
Yes. Clamp-on trays attach to the desktop edge and are a good choice for renters or desks that should not be modified. Confirm that the edge is thick and strong enough for the clamp, and check that the clamps do not interfere with drawers or a standing-desk frame.
How high should an under-desk cable tray be?
Mount it as high as practical beneath the desktop while preserving knee clearance and allowing the clamps or screws to engage fully. Many installations place the tray 2-4 inches behind the front edge. The exact height depends on desktop thickness, tray depth, and your seated legroom.
Can a cable tray hold a power strip?
Most cable trays are designed to hold a power strip, but verify the dimensions and weight limit. Measure the strip, including its cord and switch, and make sure it fits without blocking ventilation. Keep high-wattage appliances such as heaters, hot plates, and kettles off an under-desk office power strip.
How much cable slack should I leave on a standing desk?
Leave enough slack for the entire height range, not just a small loop at the tray. As a starting point, allow a gentle 2- to 4-inch reserve at the highest position, then test the desk slowly. The cable should never become taut or pull on a plug, port, or power strip.
Ready to decide? Our #1 pick for 2026 is the Under-desk cable tray.
Live price & availability on Amazon.
Related Reviews & Guides


6 Best Cable Management Desk Trays 2026

6 Best Lifespans Under Desk Treadmill 2026